
03 Mar Photography Editing Fatigue – How to fight it
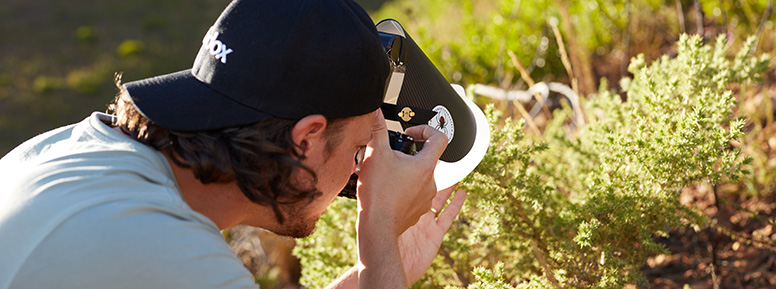
For a Nature and Wildlife Photographer there is hardly anything better than photographing animals in the wild.
Enjoying nature and the outdoors is a beautiful contrast to our fast-paced and urban modern world.
However, after the photographing part, often follows the editing of the many photos.
While this can also be quite enjoyable, it also eats up a lot of time – time we could have spent photographing instead.
The more time we spend in front of the computer editing our photos, the more it can bore us, burn us out and make us experience the so called photo editing fatigue.
What is photography editing fatigue and how can we fight it?
This article is part of a series on the psychological aspects of photography.
If you want to learn more about that, please have a look at these ones as well.
What is Photography Editing Fatigue?
The phenomenon of the so called editing fatigue describes the mental and physical exhaustion that results from extended image editing.
Post-processing of photos is a time-consuming task for most photographers, professionals in particular.
Post-processing work is especially stressful for perfectionistic photographers – who wildlife photography and macro photography in particular seems to attract a lot.
Both the technical side of this field of photography and the high grade of details that are usually shown, often require more editing than generic types of photography.
Think of focus stacking for example, or high magnification shots, where even the smallest grain of dirt is visible.
For photographers being exceptionally perfectionistic, this time invest can increase considerably!
To read more about the downsides of perfectionism in photography, check out this article.
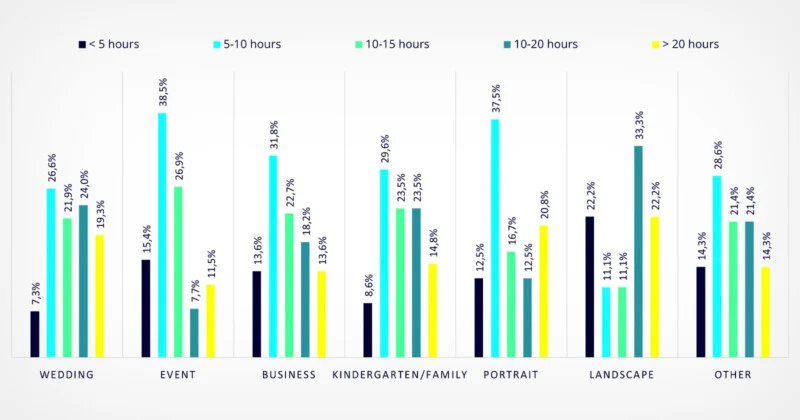
In a recent study, the german AI editing platform company Neurapix, has surveyed 423 participants (international photographers) to find out more about the phenomenon of editing fatigue in the photographic indistry and how this connects to the different branches and working conditions.
The study aims to find out if editing fatigue is indeed real, learn more about its impacts and possible causes and come up with strategies for photographers to improve caring for their health.
You can download and read the presentation of the Neurapix editing fatigue survey results, here.

Important reminder: this article is heavily based on personal preferences and experience and should hence be taken as biased.
If you enjoy spending time for post-production and actually enjoy sitting in front of the computer and doing edits, this is absolutely okay and you should ultimately do whatever makes you happy.
The scenario to trigger photography Editing Fatigue
For me personally, there are a handful of scenarios, that will trigger some kind of photographic editing fatigue in me.
The most common one, even holds me back from editing quite a lot of photos, that actually have a lot of potential.
Sometimes they never get finalized ever, nor end up anywhere on my social media or in my website´s gallery.
After a successful fieldtrip I get back with several hundreds, sometimes thousands, of photos on my memory card(s).
Many of them are focus brackets, also including those, where the subject started to move amidst the bracketing process, or those where the lighting was not perfect.
After uploading all of them to my computer, I have a first idea of how many of these stacks I would then need to first edit and postprocess and THEN stack together.
The imperfect focus bracket
While perfectly lined up focus brackets are easy to align and merge with Helicon Focus (or Zerene), it is the others, that give me a headache before even starting, annoying me so much thinking of all the work and time I will have to put into editing them, that I do not even want to start doing that.
Even for brackets, where the subject did not move its body, but only small parts like antennae or pedipalps, or slighkly tilt the head, I need to see which photos of the bracket I will need for a flawless stack and then, after editing them, manually align and mask them.
Depending on the movement (or changes in angle/distance from my side during the photographic process) this may take up 10 minutes for a photo, but can also cost me up to an hour.

If I start and finish the editing process because I see much potential in a bracket, it is very likely, that editing fatigue kicks in after finishing the first of these focus brackets/stacks.
Sometimes, after having invested quite some time into editing a stack, it may happen that I even quit after encountering errors that cannot be fixed.
How can I fight Editing Fatigue when post-processing my (Wildlife) Photos?
For professionals it will be a lot more difficult to use some of the below mentioned methods to reduce the chances of editing fatigue.
For beginners, semi-pros and a recreational shooters it will be easier.
Stopping to shoot raw and stop editing images and accepting that pefection is a state impossible to achieve, can be a challenge but will help quickly.
Comparing your own work with others and also being compared by others, after putting your work online, puts pressure on you.
You will rather be compared with the elite shots in your field of photography, rather than to failed attemps.
Learning to appreciate your own creativity and work builds a good base to make yourself visible to others.
You can read more about that in my blog article on “How to appreciate your own work”.
Please also and foremost ensure that repetetive work, like photo editing, is balanced and countered with relaxation time and contrasting work, to guarantee your mental health is not affected.
This will help both your mind and body.
Get it right in camera and do only basic editing
This may actually sound easier than it is to achieve, but getting it all right in camera will save you fixing it in post-production.
Theoretically this is the best you can do and a very simple concept.
However, to really do this, you have to be able to control your camera setup and lighting perfectly and also be lucky enough that the scene and subject do not challenge you with obstacles.
Shoot single shots instead of deep focus brackets and do not focus stack anymore
As mentioned earlier, editing focus brackets and creating focus stacks can require a lot of time.
By eliminating focus brackets and stacks from your workflow, you will ultimately save the time.
Simple as that.
You lose some, you win some.
What does that mean?
It means you have to prioritize and decide what is more important for you: getting extreme details and the best possible quality of your photos OR saving time to use this for actual photographing instead of editing.
This only applies if you are indeed prone to editing fatigue – if you enjoy post-processing sessions instead, then you´re all good.
Realizing what you will use the photos for, will help your decision.
If you do not print big, if you do not share the photos via a medium that can actually show the high grade of details, it may be a good consideration to opt for single shots instead of focus stacks.
If you need more depth-of-field, you could achieve the same effect by moving away from the subject and then crop back in.
You can read more about this technique and the struggle for more depth-of-field in macro photography, here:
Opting for single shots, also eliminates some aspects that can make creating focus brackets and stacks a real nightmare: moving subjects and the change of angle during the creation of the bracket – and with it, eliminating the frustration that comes with it.
Both, during the actual photographing process, and also during post-processing the source files.
Stop shooting RAW and skip editing completely
Going even further than the “get it right in camera with basic editing only” concept, would be to completely stop shooting in RAW format.
While you still get the photo as close to what you want to output in-camera, you do not edit from RAW, a format, which gives you a lot more potential to work with, afterwards.
Less opportunity, less work invested.
Depending on what you are using the photos for, there might be no need for the best quality and resolution possible, anyways.
If you are sharing your work only on social media, you need a fraction of the potential quality and pixel-resolution that you could achieve by exporting from edited RAW files.
Conclusion – and my personal take on this
For me personally, the biggest time-saver is shooting more single shot macro instead of focus stacks and brackets, the deep ones in particular.
This makes a huge difference in post-production.
Editing macro photos can effectively be done in Adobe Lightroom, for example, but merging the stack afterwards means additional time has to be spent.
For imperfect stacks and those not aligned well, this time can increase considerably.
I rather close the aperture a bit more and take smaller brackets or even try single shots here and there, than having to spend much time post-processing.
Ultimately time is what I value the most – to spend with family or out in nature – but not bound to my chair, sitting in front of my computer screen.
What is your take on this?
I´d love to discuss in the comments.
Sign up for the newsletter mailing list & free ebook

Did you enjoy these tips and want to learn more or improve your macro photography skills?
Stay up to date with new blog posts, reviews and tutorial- and ebook-releases.
Sign up below to get notified when the free edition of my ebook
‘How to master spider & insect macro photography’ is ready for download.
No Comments